
This is another bonus entry on our blog in the Echelon/NES Smart Meters series. As we have mentioned before, it is sometimes hard to find time besides our regular jobs to dabble with this project. We have had a lot of interest in using the IR (Infrared) port on the Echelon/NES Smart Meters, and there have been (at least with N1) some confusion about if it was encrypted or not.
We know that someone at Sommerhack 2021 had been told by N1 that they should be able to use the IR port and that the key was the same as the MBK used for the MEP communication. We have not tried that ourselves as we have chosen to focus our limited time on the MEP integration. And to our knowledge – nobody else have tried the IR approach – that is – until now :-).
Our fellow tinkere Ulrik was faced with the challenge that his power supplying company Konstant, does not allow him to use the MEP-port on his Echelon meter. They are simply following another approach compared to N1, and suggests that their customers should use the IR-port.
Overall/political speaking this is actually really good news. Because if N1 can allow us to use the MEP port in a safe way, why should Konstant be against it for security reasons? Why should they not agree to allow it sometime in the future if they are pushed?
Also – if Konstant can allow their customers to use the IR port in a safe way, why should N1 be against it for security reasons? Why should they not agree to allow it sometime in the future (if not already?) if we push them?
Some have been dreaming of being able to interface with the Echelon/NES meters for years – but it was not possible due to a lot of “red tape”. Maybe we now have or will get TWO separate interfaces for interfacing with Echelon/NES Meters?
Enough dabbling with words from dabbler.dk – let’s hand over this scene to Ulrik and let us hear what he was actually able to do with the IR port:
First of all, I would like to say thank (and sorry) to Gert and Graves for letting me ‘spam’ them with my thoughts, questions and discoveries. And of cause for helping me out from time to time :-).
INFO:
My name is Ulrik and I work as an Automation technician. I started out as an electrician and was fascinated by all the technical stuff you could do. I have around 30 Years of technical background. I build my own house in year 2000 where I put in a PLC to control the house. All lightning, heating, ventilation and alarmsystem is run from that.
Well… Back on the track… I started out collecting the pulses from my main meter by using the S0 pulses. Worked great, until I got solarpanels installed and the meter now send out pulses whenever a watt was produced or consumed, so not that usefull :-(. Then I started looking at other ways and stumbled over a lot of options, among this was the IR port. So here’s a story of how I got this to work :-).
I have a NES 83334 meter. I also use Home Assistant.
I have very little knowledge of Python and NODE RED, so ‘Google was my friend’ 🙂
I also know that this setup could be much more ‘smart’. But for now, it just might get people started to get data from the meters 😉
My supply area is KONSTANT and they will send you the decryptkey if you contact them at info@konstant.dk
They also send me a draft version of Optical Port Programmer’s Guide with some info tables in the meter.
KONSTANT also told me that the meters they are using (ECHELON / NES) have the MEP port disabled, so I was unable to use that. So I went the optical IR eye way…
Communication parameter that I use:
9600, 8, 1, none
LINKS:
Install a RAM disk (to prevent destroying the SD card.)
https://www.hellojona.com/2017/06/create-a-ram-disk-tmpfs-in-raspberry-pi-3/
ANSI C1218 protocol description:
https://kupdf.net/download/ansi-c1218_598ceccadc0d606c4b300d1a_pdf
ANSI C1219 Protocol description:
https://kupdf.net/download/ansi-c12-19-2008_5af9fdd5e2b6f501147de395_pdf
Open Smart Grid Protocol (OSGP)
https://www.etsi.org/deliver/etsi_gs/osg/001_099/001/01.01.01_60/gs_osg001v010101p.pdf
Termineter (Framework for reading data from smartmeters)
https://github.com/rsmusllp/termineter
HARDWARE USED:
IR Probe:
I bought mine from Weidmann Elektronik
https://www.weidmann-elektronik.de/Produkt_IR-Kopf.html
1.00 x IR Schreib/Lesekopf USB (Optokopf), ART0027, EUR 44,99
I have not tried other probes, but I figured at the start of this project, I did not want to have trouble with my hardware. I know it’s kind of expensive but it works 🙂
Raspberry Pi 3 model B+ with 8 gb SD card:
(I used Raspberry Pi Imager and installed Raspberry Pi OS)
Activate VNC and SSH (Raspberry PI configuration – Interfaces)
SOFTWARE:
Install SAMBA
sudo apt install samba samba-common-bin
Edit the config file:
sudo nano /etc/samba/smb.conf

[pi]
path=home/pi
read only = no
writeable = yes
browseable = yes
guest ok = yes
create mask = 0755
directory mask = 0755

Press CTRL-o and CTRL-x to save and exit
Install a RAM disk (to prevent destroying the SD card.)
Link: https://www.hellojona.com/2017/06/create-a-ram-disk-tmpfs-in-raspberry-pi-3/
mkdir /var/tmp
Edit the fstab file.
sudo nano /etc/fstab
Add the following line to /etc/fstab to create a 400MB RAM Disk
tmpfs /var/tmp tmpfs nodev,nosuid,size=400M 0 0
Execute the following command to mount the newly created RAM Disk
mount -a
To verify the RAM Disk is created and mounted successfully, execute the following command
df -h
Temporary files can now be written/read to/from /var/tmp partition.
PYTHON 3.9 (I think that it is installed on the Raspberry by default).
Install NODE-RED
I think I installed it from the Rasberry Pi ‘recommended software’ via the GUI.
Autostart Nodered: (run from a terminal / SSH)
sudo systemctl enable nodered.service
Install Temineter (Python program to communicate C1218 and C1219 protocol)
Start a terminal and install it.
git clone https://github.com/securestate/termineter.git
Change permissions on directory
sudo chmod 777 termineter -R
I edited a some of files (I use Visual Studio Code through the SAMBA share) to get this to work.
You can use the files from the attached zip of use them as inspiration to copy/waste.
Changed files:
lib/c1228/connection.py
lib/termineter/core.py
lib/termineter/modules/get_data.py
lib/termineter/modules/read_part.py
TERMINETER program changes
lib\termineter\core.py:
*** Section around ‘Setup end configure options’
self.options.add_string('SERIAL_CONNECTION', 'serial connection string',default='/dev/ttyUSB0')
self.options.add_string('PASSWORD', 'serial c12.18 password', default='<your decryptkey here!>')
self.advanced_options.add_integer('C1218_PACKET_SIZE', 'c12.18 maximum packet size', default=64)
Run the program:
python ./termineter

Termineter
 <[ termineter v1.0.5
 <[ model: T-1000
 <[ loaded modules: 19

termineter >
Run the module to start getting data:
termineter > run get_data
Hopefully the program starte to get data (and save it in the /var/tmp folder)
[+] Successfully connected and the device is responding
[*] Read 8 bytes
0000 74 40 05 00 9f 1d 00 00                         t@......
[*] Read 40 bytes
0000 96 0a 00 00 00 00 00 00 00 00 00 00 39 02 00 00 ............9...
0010 f8 0c 00 00 dc 0c 00 00 90 19 00 00 27 70 03 00 ............'p..
0020 ef 6f 03 00 76 70 03 00                         .o..vp..
Instead of (or additional) to make the program changes, you can use a ‘resource file’ (look at
https://github.com/rsmusllp/termineter/wiki/GettingStarted at the bottom)
If you use a resource file, you can ‘autostart’ the program.
Errorhandling still needs to be taken care of 😉
NODE-RED Program:
The data from termineter is stored in /var/tmp BT23 and BT28 and is updated every 10 sec-ish.
I use NODE-RED to handle the data (and send them to HomeAssistant via MQTT)
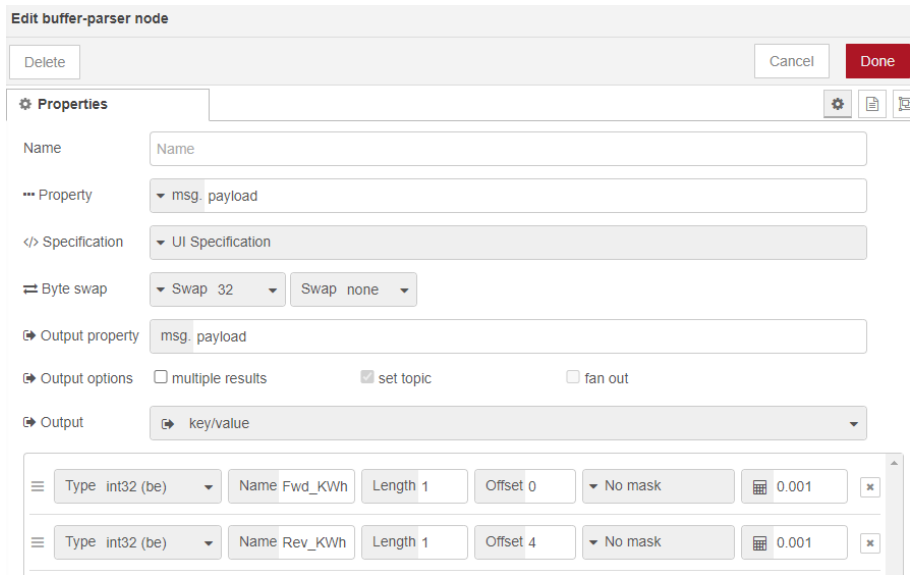
Install the ‘Bufferparser’. (Manage palette and search for ‘node-red-contrib-buffer-parser’)
The Bufferparser handles and changes the data from the files in /var/tmp and makes the data ready.
Afterwards the data is made ready in a function and finally sent by MQTT.
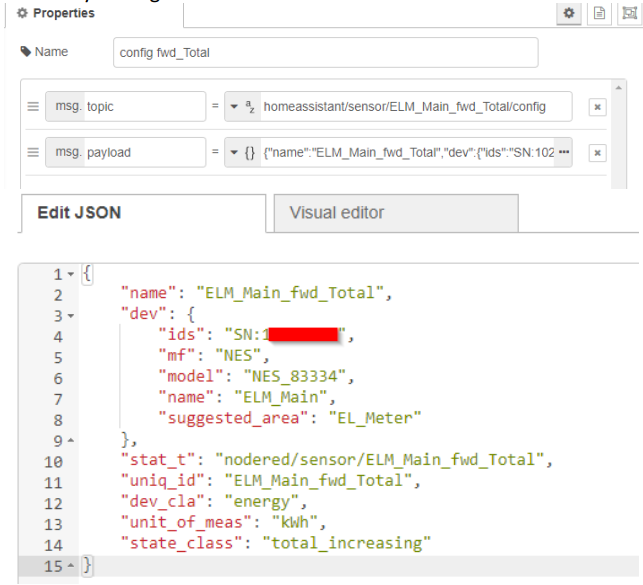
I also tried to make some ‘autodiscovery sensors’ for HomeAssistant.
Screendump of the Flow:
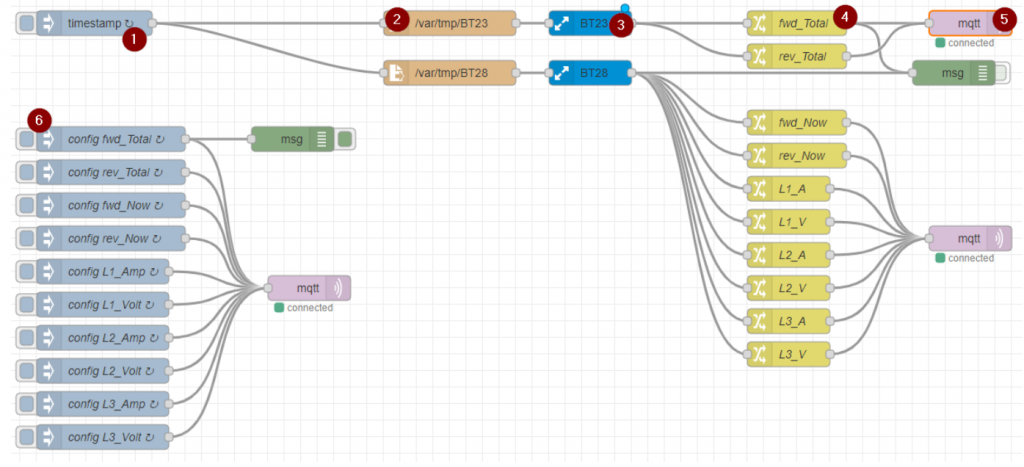
1. Timestamp runs every 10 secs.
2. Function /var/tmp/BT23:

3. BufferParser BT23:
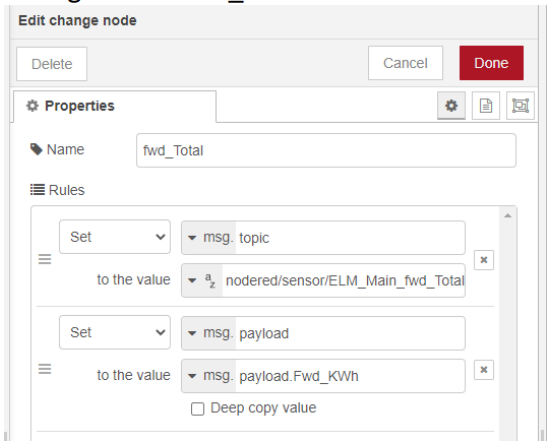
4. Change node ‘fwd_total’:
5. MQTT: Setup according to your MQTT broker settings.
6. Discovery settings for HomeAssistant
Screenshot from HomeAssistant:
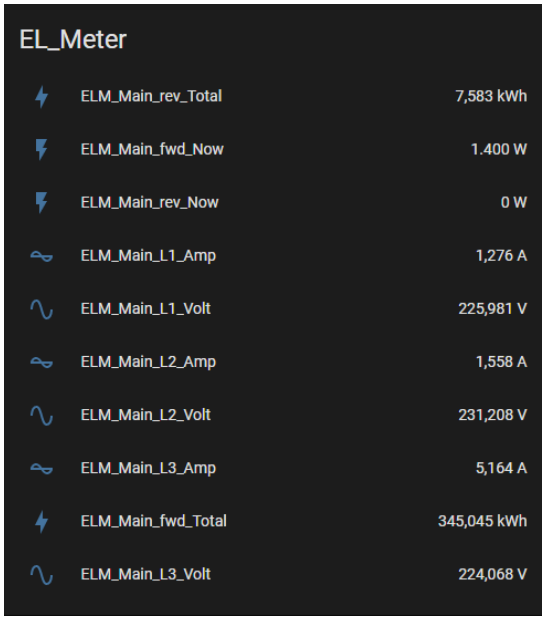
Hope this can inspire other to get data from ECHELON/NES meters via IR eye.
🙂 Ulrik, email: u_dabbler[AT]dumac.dk
We are using “Cerius” at net company on Sjælland.
I have tried to contact them regarding an “encryption-key” for my echelon meter, but they had no idea what I was talking about.
I was wondering what “key-words” you used to get the key from your net company?
Thanks.
Hi Peter Haugaard,
And thanks for your interest in this project.
After discussing the process with N1, we came up with this Danish “procedure” description for a session we did at Sommerhack 2021:
I hope this help you, but besides this the confusion can also be caused by the key actually having multiple names.
In some documentation (newer ones) it is called the MBK (“MEP Basic Key”).
In older documentation is is called BEK (“Base Encryption Key”). We know for sure it is the same key, because in some documentation it is stated that the BEK is the old name for the MBK.
For at least some meters we have been told that the key might also be used for the IR port, but it is unknown if that is because two separate keys are just set to the same value, or it actually is the same physical memory in the meter…
Anyway – on IR it seems to be called RK (“Read-only Key”).
Note: The actual key is 20 ASCII characters.
The N1 one only have 0-9 and A-F in it, but it is NOT 10 HEX characters (10 bytes), but actually 20 bytes (20 ASCII characters / 20 bytes).
Best regards,
Gert Lynge
How complex is the code communicating on the IR port ?
I wonder if it can be squeezed down to a “normal” c/c++ code entry, that will fit inside an ESP32 …
Hi Brian Ipsen,
This blog entry was written by a guest writer, Ulrik. So he is probably more qualified to answer this than we are, as we have not looked much into the IR protocol yet.
That said, with the limited time I’ve looked at it, I cannot imagine it would be impossible to make a ESP32 “bridge” between the IR and a webservice or even MQTT. That is what we are doing with an ESP32 and the MEP port – and we have plenty of ressources for a webserver, tinkering http-page and even a http-dashboard…
Anyway – I hope Ulrik reads this and can reply with a more qualified answer.
I have finally got my key from Cerius and I am now trying to use this “IR”-solution. But I’m getting an error:
<[ termineter v1.0.5
<[ model: T-1000
run get_data
CRITICAL failed 3 times to correctly send a frame
[-] Caught C1218IOError: ‘failed 3 times to correctly send a frame’
Have others seen this error before?
Thanks.
Hi Peter
I have been in contact with Cerius and they will not provide the key to the IR eye, but only for the MEP port.
I have the same issue. I have the nes 83332-3IAAD.
Hi Peter
I had the same issue. Enabling the debug option of termineter with -L debug gave me a hint. Have a look at this output:
DEBUG sending frame, length: 9 data: ee0000000001201310
ERROR received unknown response: 0xff after writing data
ERROR received unknown response: 0x0 after writing data
ERROR received unknown response: 0x0 after writing data
CRITICAL failed 3 times to correctly send a frame
My guess was that TX signal was being reflected in to the RX receiver, as the data out and in was (sorta) the same.
Indeed sending arbitrary text to the port, and reading concurrently gave me the same text back.
I fixed my issue by putting a small strip of foam tape between the diodes on the power meter.
Hi Martin, could you find any solution for this?
Hi David and Martin,
Please note that you might get better help toward the IR interface by asking on the OSGP Alliance GitHub Discussion board: https://github.com/OSGP-Alliance-MEP-and-Optical
I can concur, the foam strip solves this issue
Hi Peter
I also got a key from Cerius, but it doesn’t seem to work on IR. I am getting “Caught C1218ReadTableError: ‘could not read table id: 23, error: isc (Insufficient Security Clearance)'”
I suspect they have sent the MBK instead of the RK for IR. I have tried padding before and after with 0x00 and also converting the 20 chars to hex. still no luck.
Did you do something else?
You should be able to use the following commands without the password:
use read_table
set TABLE_ID 0
run
and get some result.
It can also be that your IR eye is upside down and therefore can’t communicate with the meter.
Very nice.
My challenge is, that the meter is located outside, so don’t know how I would be able to power a pi. And if it’s still the case, that konstant is locking the MEP port, I’m not entirely sure if there’s a solution to my case?
Anyone with the same use case, that solved this?
Hi Karsten
Unfortunately we have not been playing around with the IR solution yet, and to our knowledge you are right – Konstant have locked the MEP port.
I would say the best bet would be:
1. Create a battery powered ESP8266/ESP32 (or similar) solution with deep sleep, that wake up i.e. once a second to connect via IR and relay the data to something else (like a Raspberry PI or a cloud service). Then you can get the data from the Raspberry PI/Cloud in almost real time. You might be able to charge the battery with a solar panel or induction through the closed meter cabinet. You might even be able to mount the whole solution outside the cabinet if the IR interface is visible (but I’m not sure about if the “glass” in the cabinet will allow IR to pass through).
2. Find a way to get power to the meter cabinet. It IS connected through to your fusebox – probably via some pipes. So it might be possible to pull through a small cable with a 5v supply from the fusebox… Maybe an ethernet cable and then a Power over Ethernet shield for the Raspberry PI? (then you have both Ethernet and power).
3. If the MEP port is still physical accessible, check if you have 24v or 26v between pin 1 and 5. It is max 1 watt, so it is NOT enough for a Raspberry PI, but you might get away with a ESP8266 or ESP32 solution (buck converter to get to the 3.3v they required). See https://www.dabbler.dk/index.php/2021/09/14/echelon-nes-smart-meters-the-secret-interface/
4. Call your electrician and ask if he have a solution
5. Push Konstant to see if we can get them to open the MEP interface. Some of the major players (https://ens.dk/sites/ens.dk/files/Statistik/elnetgraenser.pdf) have it open, and typically the power companies share knowledge – so maybe they will change their mind if they are pushed a bit.
Others might have better solutions for you.
Note: I’ve tried to reach out to Konstant to see if I can help push them a bit for a solution (now other major power companies have opened the MEP interface). But please try to push them as well…
Were you ever able to push Konstant to open the MEP port?
Hi Mathias
Short answer: Yes.
Longer answer:
Please see the GitHub we setup for OSGP Alliance. We try to keep the information regarding obtaining the keys on the discussion board there . According to this entry it should be possible: https://github.com/orgs/OSGP-Alliance-MEP-and-Optical/discussions/6