Some of you might recall that this blog is not limited to posts about Echelon/NES meters, and know it is actually for all kind of stuff Graves and I am dabbling with. Granted, lately it’s been mostly about our Echelon/NES project – but we have not stopped dabbling with other stuff too :-).
You might know that my day job is to develop solutions in Microsoft Dynamics 365 Business Central (I’ll call it BC in this entry), and for some time I had an idea I would like to share with the community:
As some of you might know, the BC web client and Microsoft’s chosen path has made it quite an expensive challenge to do direct print (direct print is when you do a print directly to a printer – without the user having to i.e., download a PDF and then print it manually).
Others also have solutions for this – and it might even be included in something more advanced like ForNAV Direct Print.
But why didn’t someone design and do a cheap, Do-It-Yourself solution?
…and – if you are on BC SaaS, but still need a simple, cheap solution to print on local and cheap printers? Or even Network printers that does not support e-mail printing?
And off cause we should try to keep it as cheap and simple as possible – and don’t rely on any special ports to be forwarded and open in firewall etc. That is simply too cumbersome for regular users to setup!
BC App – maybe a Per Tenant Extension?
Well, imagine installing an app on your BC that collects all printjobs as PDF and store them in a BC table. Then making them available through a webservice of some kind… While at it we could do a secondary webservice allowing “Print Processors” (I’ll explain what that is in a minute) to register printers with BC, so they are available for printing directly in BC.
We must do it, so we are able to install and use it for both BC OnPrem and BC SaaS, right?
So, what is this “Print Processor” thingy and what does it run on?
Well, it is something that can obtain a list of available printers and call a BC webservice to tell BC about them. It should also call a BC webservice at some interval to see if there are any print jobs (PDFs) waiting, and if so – fetch the PDFs and print them. For the last part we can simply rely on solutions other created – it cannot be that hard to print a PDF, right?
Ideally the “Print Processor” should be available on multiple platforms, it only has a few requirements:
Connect to the network so it can call BC webservices (Internet if BC SaaS)
Call webservices and handle the result
Connect to the local printer (network, USB etc.)
Print a PDF to a local printer
Ideally it could just be some kind of script? Python for Linux and other Unix like systems (some NAS servers even run Unix like systems). And maybe PowerShell for Windows while we are at it?
This is in NO WAY final “production” quality software, but feel free to use it on your own costs and risk and build on it. Release it commercially, use it privately etc. Please always keep a reference to this blog somewhere people see when they use it. And please give back any improvements to the GitHub repository and the community…
This is another bonus entry on our blog in the Echelon/NES Smart Meters series. As we have mentioned before, it is sometimes hard to find time besides our regular jobs to dabble with this project. We have had a lot of interest in using the IR (Infrared) port on the Echelon/NES Smart Meters, and there have been (at least with N1) some confusion about if it was encrypted or not.
We know that someone at Sommerhack 2021 had been told by N1 that they should be able to use the IR port and that the key was the same as the MBK used for the MEP communication. We have not tried that ourselves as we have chosen to focus our limited time on the MEP integration. And to our knowledge – nobody else have tried the IR approach – that is – until now :-).
Our fellow tinkere Ulrik was faced with the challenge that his power supplying company Konstant, does not allow him to use the MEP-port on his Echelon meter. They are simply following another approach compared to N1, and suggests that their customers should use the IR-port.
Overall/political speaking this is actually really good news. Because if N1 can allow us to use the MEP port in a safe way, why should Konstant be against it for security reasons? Why should they not agree to allow it sometime in the future if they are pushed? Also – if Konstant can allow their customers to use the IR port in a safe way, why should N1 be against it for security reasons? Why should they not agree to allow it sometime in the future (if not already?) if we push them?
Some have been dreaming of being able to interface with the Echelon/NES meters for years – but it was not possible due to a lot of “red tape”. Maybe we now have or will get TWO separate interfaces for interfacing with Echelon/NES Meters?
Enough dabbling with words from dabbler.dk – let’s hand over this scene to Ulrik and let us hear what he was actually able to do with the IR port:
First of all, I would like to say thank (and sorry) to Gert and Graves for letting me ‘spam’ them with my thoughts, questions and discoveries. And of cause for helping me out from time to time :-).
INFO: My name is Ulrik and I work as an Automation technician. I started out as an electrician and was fascinated by all the technical stuff you could do. I have around 30 Years of technical background. I build my own house in year 2000 where I put in a PLC to control the house. All lightning, heating, ventilation and alarmsystem is run from that. Well… Back on the track… I started out collecting the pulses from my main meter by using the S0 pulses. Worked great, until I got solarpanels installed and the meter now send out pulses whenever a watt was produced or consumed, so not that usefull :-(. Then I started looking at other ways and stumbled over a lot of options, among this was the IR port. So here’s a story of how I got this to work :-). I have a NES 83334 meter. I also use Home Assistant.
I have very little knowledge of Python and NODE RED, so ‘Google was my friend’ 🙂 I also know that this setup could be much more ‘smart’. But for now, it just might get people started to get data from the meters 😉
My supply area is KONSTANT and they will send you the decryptkey if you contact them at info@konstant.dk
They also send me a draft version of Optical Port Programmer’s Guide with some info tables in the meter.
KONSTANT also told me that the meters they are using (ECHELON / NES) have the MEP port disabled, so I was unable to use that. So I went the optical IR eye way…
Communication parameter that I use: 9600, 8, 1, none
1.00 x IR Schreib/Lesekopf USB (Optokopf), ART0027, EUR 44,99
I have not tried other probes, but I figured at the start of this project, I did not want to have trouble with my hardware. I know it’s kind of expensive but it works 🙂
Raspberry Pi 3 model B+ with 8 gb SD card: (I used Raspberry Pi Imager and installed Raspberry Pi OS) Activate VNC and SSH (Raspberry PI configuration – Interfaces)
SOFTWARE:
Install SAMBA
sudo apt install samba samba-common-bin
Edit the config file:
sudo nano /etc/samba/smb.conf

[pi]
path=home/pi
read only = no
writeable = yes
browseable = yes
guest ok = yes
create mask = 0755
directory mask = 0755

Press CTRL-o and CTRL-x to save and exit
I edited a some of files (I use Visual Studio Code through the SAMBA share) to get this to work. You can use the files from the attached zip of use them as inspiration to copy/waste.
If you use a resource file, you can ‘autostart’ the program.
Errorhandling still needs to be taken care of 😉
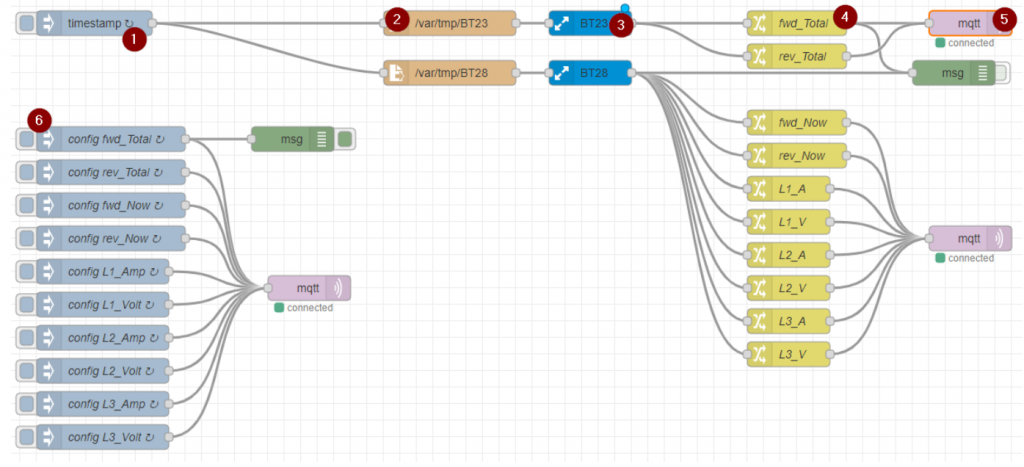
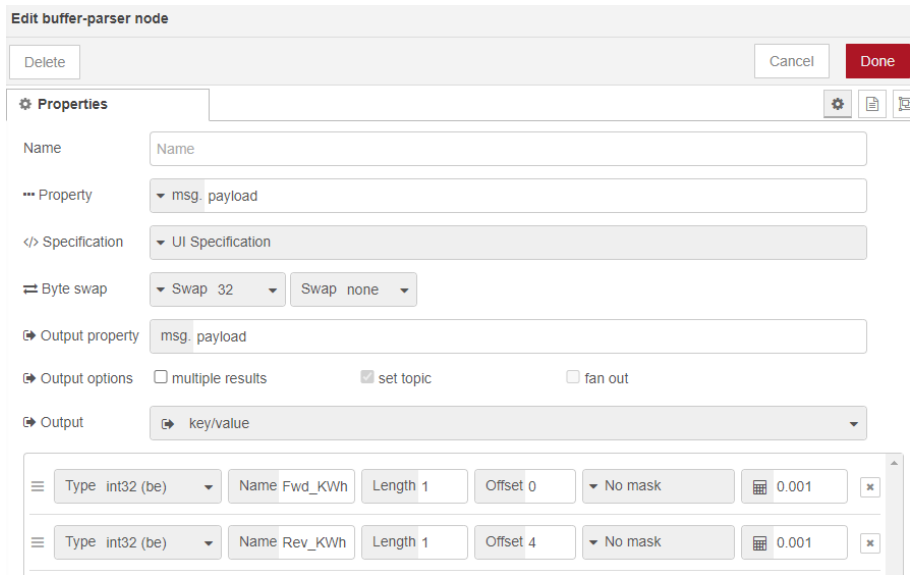
NODE-RED Program: The data from termineter is stored in /var/tmp BT23 and BT28 and is updated every 10 sec-ish. I use NODE-RED to handle the data (and send them to HomeAssistant via MQTT) Install the ‘Bufferparser’. (Manage palette and search for ‘node-red-contrib-buffer-parser’) The Bufferparser handles and changes the data from the files in /var/tmp and makes the data ready. Afterwards the data is made ready in a function and finally sent by MQTT.
I also tried to make some ‘autodiscovery sensors’ for HomeAssistant.
Screendump of the Flow:
HomeAssistant – Screendump of the Flow
1. Timestamp runs every 10 secs.
2. Function /var/tmp/BT23:
HomeAssistant – Function
3. BufferParser BT23:
HomeAssistant – Buffer-parser
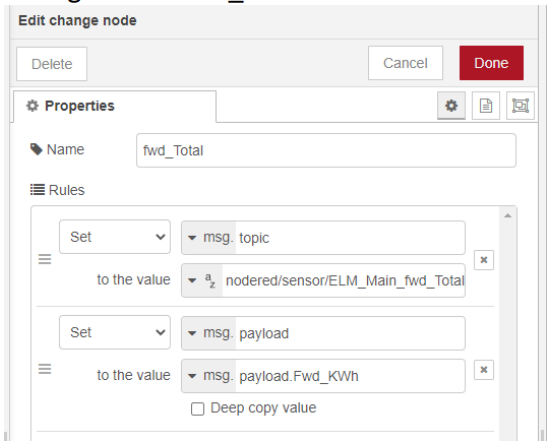
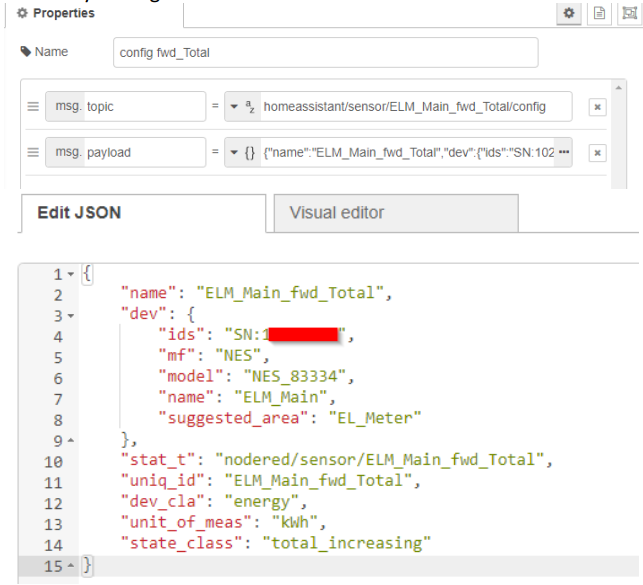
4. Change node ‘fwd_total’:
HomeAssistant – Fwd_total
5. MQTT: Setup according to your MQTT broker settings.
6. Discovery settings for HomeAssistant
HomeAssistant – Discovery settings
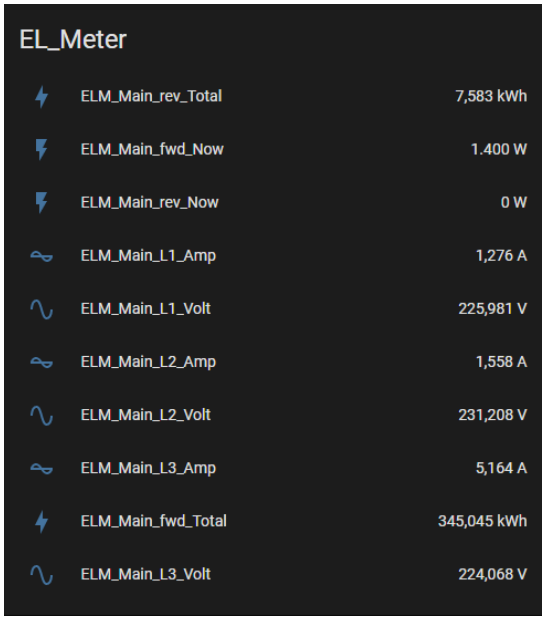
Screenshot from HomeAssistant:
HomeAssistant – Screenshot
Hope this can inspire other to get data from ECHELON/NES meters via IR eye.