Commodore 64 s/n U.K.B1717794 Repair Log (Work In Progress)

Commodore logo

Do you have a defective / non working Commodore 64 breadbin?
I probably want it!
Make me an offer on gert@dabbler.dk and state if you want to sell it or swap it for this working one (you will have to pay my costs in parts and shipping – but not my time) 🙂


Purchased 22th August 2017 on eBay:

  • Breadbin: SER.NO.U.K.B1717794
  • Motherboard: S/N 938896, assy No. 250407, artwork no. 251137, rev. B. Made in Hong Kong
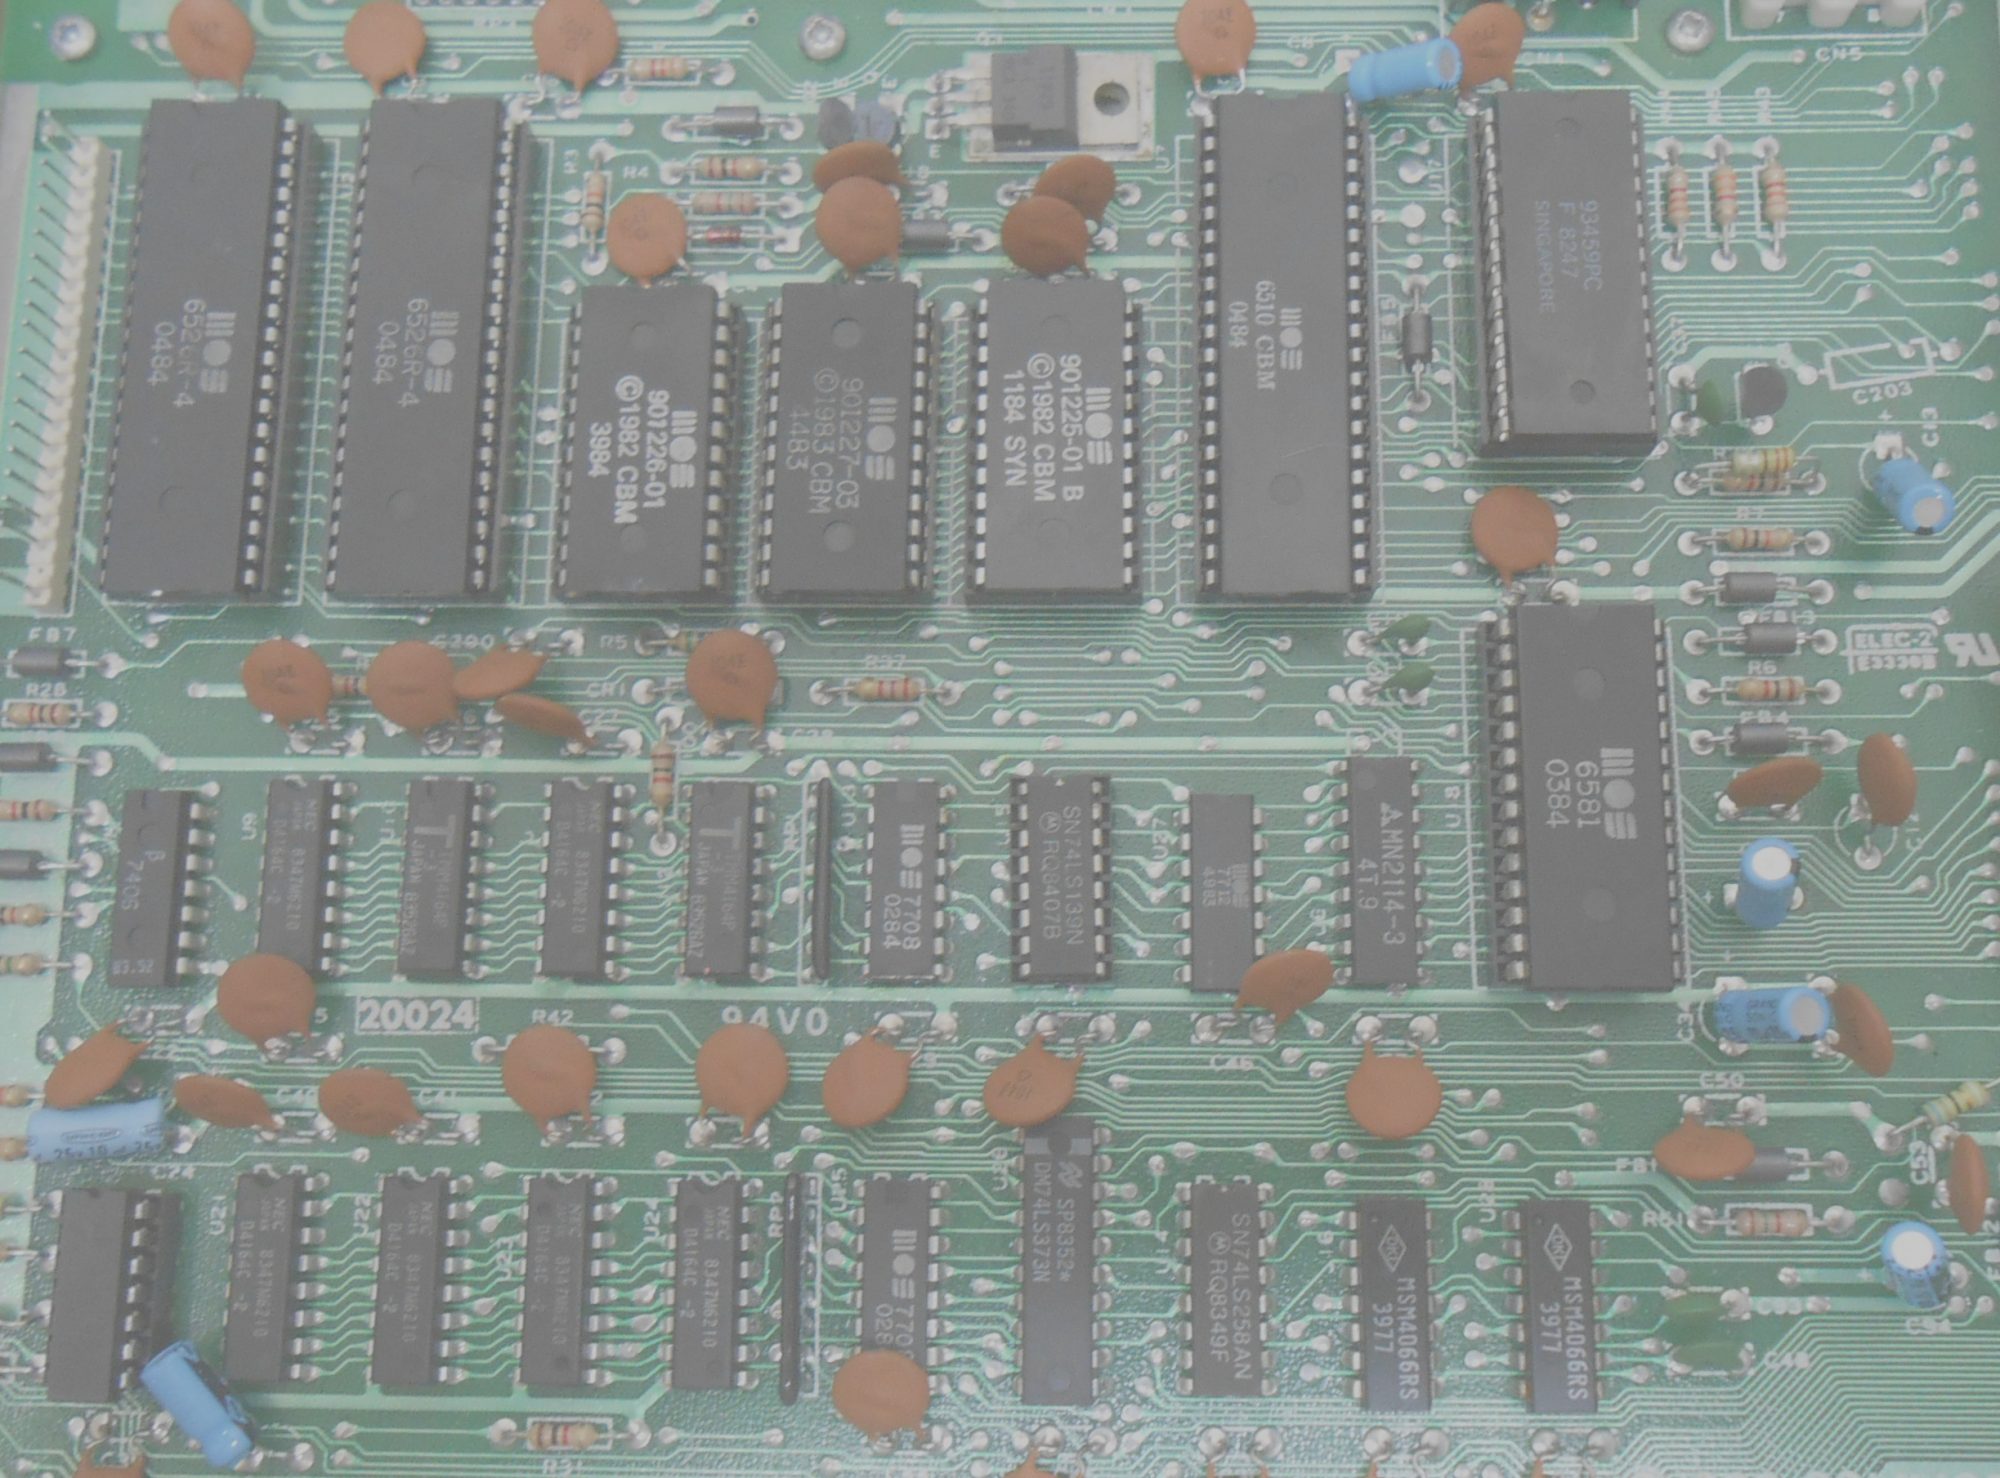
 

Chips:

  • U1: CIA, MOS 6526, week 25, 1984
  • U2: CIA, MOS 6526, week 19, 1984
  • U3: BASIC ROM, MOS 901226-01, week 25, 1984
  • U4: Kernal ROM, MOS 901227-03, week 24, 1984
  • U5: Character ROM, MOS 901225-01 (no week and year)
  • U6: Color RAM, MM2114N (no week and year)
  • U7: CPU, MOS 6510, week 29, 1984
  • U17: PLA, MOS 906114-01, week 22, 1984
  • U18: SID, MOS 6581, week 25, 1984
  • U19, VIC2, MOS 6569R2, week 25, 1984
  • RAM, 8*Mitsubishi Electric M5K4164ANP


Sellers description:

Commodore 64 keyboard.
No other items with this.
I have confirmed the power light lights up when plugging my power pack in.
2 loose buttons, included. Can be glued back on.


Repair log:

  • 4 loose buttons (F1, +, C= and Run/Stop). Replaced plundgers
  • Plastic screw holes for motherboard damaged. Repaired/recreated/strengthened with hot glue
  • Cabinet screw holes damaged. Repaired/recreated with hot glue
  • F7/F8 not working – broken trace on keyboard PCB repaired
  • U25 (MOS7708, week 23, 1984) defective. Black screen but with video sync. Replaced with HD74LS257P. Board hard do desolder on because of corrosion, so damaged 3 tracks. Those repaired with wires.


Work in progress:

  • 1 wobling button (V). Glue half broken plundger if possible – otherwise replace
  • Cleaning
  • re-capping motherboard/RF-module
  • Heatsinking larger MOS chips
  • Overvoltage protection on motherboard (P6KE6.8CA)
  • Build a PSU


Costs (total DKK 800):

  • Breadbin: DKK 400,-
  • Plundgers: DKK 75,-
  • PSU (transformator, wire, connector): DKK 225,-
  • Misc.: DKK 100,-

Let me know if you will buy it for my costs when it is done 🙂

Commodore 64 s/n U.K.B1309074 Repair Log (Work In Progress)

Commodore logo

Do you have a defective / non working Commodore 64 breadbin?
I probably want it!
Make me an offer on gert@dabbler.dk and state if you want to sell it or swap it for this working one (you will have to pay my costs in parts and shipping – but not my time) 🙂


Purchased 18th August 2017 on eBay:

  • Breadbin: SER.NO.U.K.B1309074
  • PSU: Part No. 310200-04
  • Datasette: C2N, Serial No 2871008, Made in Taiwan
  • Joystick: Spectravideo, model 318-102
  • Original Commodore 64 MicroComputer User Manual, 1984, Printed in England
  • The Commodore 64 Games Book – 21 Sensational Games by Oweb Bishop, 1983, Printed in Great Britain
  • Motherboard: S/N 057894, assy No. 250425, Made in Hong Kong


Chips:

  • U1: CIA, MOS 6526, week 31, 1984
  • U2: CIA, MOS 6526, week 31, 1984
  • U3: BASIC ROM, MOS 901226-01, week 28, 1984
  • U4: Kernal ROM, MOS 901227-03, 1983 (no week)
  • U5: Character ROM, MOS 901225-01, week 33, 1984
  • U6: Color RAM, MM2114N, week 24, 1984
  • U7: CPU, MOS 6510, week 31, 1984
  • U17: PLA, MOS 906114-01, week 27, 1984
  • U18: SID, MOS 6581, week 28, 1984
  • U19, VIC2, MOS 6569R2, week 35, 1984. Defective replaced by TDB
  • U31, MOS 8701, week 34, 1984. Defective replaced by TDB
  • RAM, 8*NEC D4164-2


Sellers description:

Good Commodore 64 personal computer, tape player, 1 joystick, leads + power pack.
The power pack overheated at one stage but still worked – hence the tape around it.
I have not tested to see if the power pack will still work but I would say it was much safer to use an alternative power pack!
The Commodore has not recently been tested but was working when last used and has been well looked after so I do not see there would be any problems with it.
No original packaging.


Repair log:

  • Black screen of Death. No clock on MOS 8701. Replaced
  • Grey screen of Death (blue border). VIC2 defective. Replaced.
  • Glued datasette connector (broken plastic). Ground wire torn – hidden in connector (rarely used anyway).
  • Trashed PSU as it is non-repairable (covered in un-removable epoxy). Salvaged wire/connector for Commodore 64
  • Re-capped motherboard
  • Cleaned and lubricated datasette
  • Changed both drive belts in datasette


Work in progress:

  • Heatsinking larger MOS chips
  • Put week+year of new 8701 and VIC2 in here 🙂
  • Overvoltage protection on motherboard (P6KE6.8CA)
  • Re-capping datasette
  • Build new PSU
  • Clean/test joystick


Costs (total DKK 1.000):

  • Breadbin, joystick, books and datasette: DKK 500.-
  • MOS 8701: DKK 100,-
  • VIC2: DKK 175,-
  • PSU (transformator): DKK 125,-
  • Misc.: DKK 100,-

Let me know if you will buy it for my costs when it is done 🙂

A Commodore 64 Diagnostic Cartridge on Steroids

Commodore logo

Unfortunately I did’nt win Jan Betas Commodore 64 Cartridge give away, so I had to build my own. And why not take it to the next level:

  • Winbound W27C512-45Z EEPROMs
    10 pcs bought on www.e-bay.com from a Top-rated seller. They were bought as used, but working. They shipped in 3 tubes, 2*4 pcs and 1*2 pcs. Strangely enough the 2 pcs in the same tube were defective (the programmer software warned about wrong IDs and was not able to erase them – not even with the ID-check turned off). The price was low and I’ve had them for some time before I found out, so I did’nt complain to the seller
  • TL866CS Mini USB high-performance universal programmer with 5 socket adapters
    I know I could have programmed my EEPROMs with a PC parallel port or an DIYArduino programmer, but I needed a programmer for other projects anyway
    Bought from www.satkit.com
  • C64 ROM Cartridge
    In future projects I’m planning to try to order prototype print online, but I did’nt have the PCB layout and currently have no experience in ordering PCBs online. So i choose to buy something working and even got a plastic case.
    Bought from www.TheFutureWas8bit.com

Then the task was simply to figure out how the Cartridge PCB works.

The PCB is delivered with a plastic case, but I don’t use it. I need to have full access to the jumpers and EEPROM so I can re-program it.

WARNING: All the jumpers have default traces on the PCB you need to break before installing pin headers for jumpers. If you don’t need jumpers, you should leave the traces alone so the pins are not floating :-).

Then I made a plan for which ROMs I wanted to put on the EEPROM and at which address in the EEPROM. You could install one ROM per EEPROM, but since all the diagnostic ROMs i found were 8KB and the EEPROM was 64KB it would waste a lot of EEPROM space.

Luckily the A13, A14 and A15 jumpers on the ROM cartridge actually makes it possible to choose 8 different “banks” of 8KB out of the 64KB EEPROM. So in fact the 3 jumpers will choose between up to 8 ROMS of 8KB each.

In the following table “L” or “R” tells if the jumper should be installed in the Left or Right position. Note that hex 2000 is actually 8KB (8.192 bytes).

EEPROM
addr.
A13-A15 Game/
ExROM
ROM
L/H
Dead Test 781220 0x00000 LLL L R
Diagnostic 586220 0x02000 RLL R L
Diagnostic 4.1.0 0x04000 LRL R L
Diagnostic 324517 0x06000 RRL R L
Doktor 64 0x08000 LLR R L
(Empty) 0x0A000 RLR n/a n/a
(Empty) 0x0C000 LRR n/a n/a
1541 Diagnostic 0x0E000 RRR R L

I’ve also filled in the Game/ExROM and ROM Low/High configuration as the Dead Test ROM is special: it runs in Ultimax mode at 0xE000 (ROM high), while the other ROMs I use runs in Game mode at 0x8000 (ROM low).
Note that the Game/ExROM jumper probably should have been named ExROM/Game as ExROM/Ultimax is active when it is set in the left position.

Commodore 64 Cartridge

Thanks to WorldOfJani for providing the ROMs for download on the blog. Note that you need to burn the .bin file as the .crt file is for Commodore 64 emulators.

Hint: When you load the individual ROMs in MiniPro (the software included with the programmer), it is possible to disabling clearing the programming buffer before loading and also setting the loading address according to the table above.

After burning the ROM, I found that the Diagnostic 324517 did’nt work – the Commodore 64 just started as if no cartridge was inserted. Af re-burning the EEPROM a few times, I realized that the .bin file is corrupt and converted the .crt file to a .bin fil using CARTCONV.EXE from the VICE Commodore 64 emulator. That worked. I’ve added a comment on the WorldOfJani blog about that.

On my to-do list is to create the two different test harness required by four of the ROMs.

Commodore 64 s/n U.K.B1697889 Repair Log

Commodore logo

Do you have a defective / non working Commodore 64 breadbin?
I probably want it!
Make me an offer on gert@dabbler.dk and state if you want to sell it or swap it for this working one (you will have to pay my costs in parts and shipping – but not my time) 🙂


Purchased 8th August 2017 on eBay:

  • Breadbin: SER.NO.U.K.B1697889
  • PSU: Part no. 251 053-11
  • Datasette: C2N, Serial No 01202217, Made in Taiwan
  • Motherboard: S/N UA196145, assy No. 250407, artwork no. 251137, rev. B. Made in Hong Kong


Chips:

  • U1: CIA, MOS 6526, week 39, 1984
  • U2: CIA, MOS 6526, week 39, 1984
  • U3: BASIC ROM, MOS 901226-01, week 28, 1984
  • U4: Kernal ROM, MOS 901227-03, week 36, 1984
  • U5: Character ROM, MOS 901225-01, (no week/year)
  • U6: Color RAM, MM2114N, week 32, 1984
  • U7: CPU, MOS 6510, week 27, 1984
  • U17: PLA, MOS 906114-01, week 35, 1984
  • U18: SID, MOS 6581, week 34, 1984. Defective – replaced with 6581R4AR, week 14, 1990
  • U19, VIC2, MOS 6569R3, week 39, 1984
  • RAM, 7*OKI M3764-20, 1*Sharp LH2164-15


Sellers description:

Commodore 64 Computer C64 Breadbin With Power & Datasette Faulty Spares & Repairs BUY NOW.
Greet Computer found in job lot of items and will sadly not power on ?
Maybe easy fix for someone or at least loads of spares. Comes with power pack and datasette only.


Repair log:

  • 9v, 1.5A fuse in PSU blown, changed
  • SID defective, black screen. Works w/o sound when removed. Replaced with spare
  • PSU 5v rail rebuild for future proofing:
    7805 voltage regulator, original electrolytic capacitor and a few other passive components  replaced with 3A buck converter with 4700uF 25v electrolytic capacitor on input. Patched in after diode rectifier.
  • Re-capped motherboard
  • Future proofed the larger MOS chips which heat sinks
  • Cleaned and lubricated datasette
  • Re-capped datasette
  • Fixed ticking noice from datasette when fast forwarding with a piece of heat shrink tube (se picture)
  • Changed both drive belts in datasette
  • Over-voltage protection of 5v PSU-rail on motherboard (installed P6KE6.8CA)


Costs (total DKK 875):

  • Breadbin, PSU and datasette: DKK 525.-
  • SID: DKK 250,-
  • Misc.: DKK 100,-

Let me know if you will buy or swap with this unit 🙂