A Commodore 64 Diagnostic Cartridge on Steroids

Commodore logo

Unfortunately I did’nt win Jan Betas Commodore 64 Cartridge give away, so I had to build my own. And why not take it to the next level:

  • Winbound W27C512-45Z EEPROMs
    10 pcs bought on www.e-bay.com from a Top-rated seller. They were bought as used, but working. They shipped in 3 tubes, 2*4 pcs and 1*2 pcs. Strangely enough the 2 pcs in the same tube were defective (the programmer software warned about wrong IDs and was not able to erase them – not even with the ID-check turned off). The price was low and I’ve had them for some time before I found out, so I did’nt complain to the seller
  • TL866CS Mini USB high-performance universal programmer with 5 socket adapters
    I know I could have programmed my EEPROMs with a PC parallel port or an DIYArduino programmer, but I needed a programmer for other projects anyway
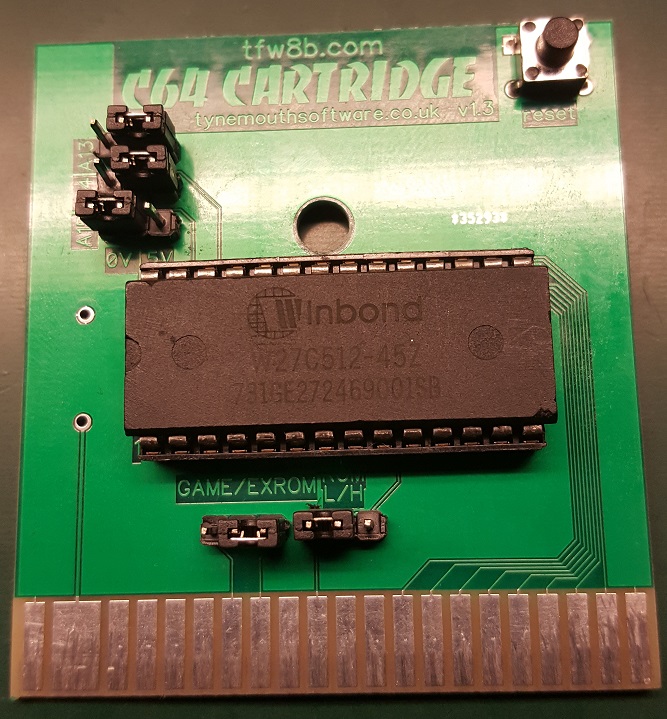
    Bought from www.satkit.com
  • C64 ROM Cartridge
    In future projects I’m planning to try to order prototype print online, but I did’nt have the PCB layout and currently have no experience in ordering PCBs online. So i choose to buy something working and even got a plastic case.
    Bought from www.TheFutureWas8bit.com

Then the task was simply to figure out how the Cartridge PCB works.

The PCB is delivered with a plastic case, but I don’t use it. I need to have full access to the jumpers and EEPROM so I can re-program it.

WARNING: All the jumpers have default traces on the PCB you need to break before installing pin headers for jumpers. If you don’t need jumpers, you should leave the traces alone so the pins are not floating :-).

Then I made a plan for which ROMs I wanted to put on the EEPROM and at which address in the EEPROM. You could install one ROM per EEPROM, but since all the diagnostic ROMs i found were 8KB and the EEPROM was 64KB it would waste a lot of EEPROM space.

Luckily the A13, A14 and A15 jumpers on the ROM cartridge actually makes it possible to choose 8 different “banks” of 8KB out of the 64KB EEPROM. So in fact the 3 jumpers will choose between up to 8 ROMS of 8KB each.

In the following table “L” or “R” tells if the jumper should be installed in the Left or Right position. Note that hex 2000 is actually 8KB (8.192 bytes).

EEPROM
addr.
A13-A15 Game/
ExROM
ROM
L/H
Dead Test 781220 0x00000 LLL L R
Diagnostic 586220 0x02000 RLL R L
Diagnostic 4.1.0 0x04000 LRL R L
Diagnostic 324517 0x06000 RRL R L
Doktor 64 0x08000 LLR R L
(Empty) 0x0A000 RLR n/a n/a
(Empty) 0x0C000 LRR n/a n/a
1541 Diagnostic 0x0E000 RRR R L

I’ve also filled in the Game/ExROM and ROM Low/High configuration as the Dead Test ROM is special: it runs in Ultimax mode at 0xE000 (ROM high), while the other ROMs I use runs in Game mode at 0x8000 (ROM low).
Note that the Game/ExROM jumper probably should have been named ExROM/Game as ExROM/Ultimax is active when it is set in the left position.

Commodore 64 Cartridge

Thanks to WorldOfJani for providing the ROMs for download on the blog. Note that you need to burn the .bin file as the .crt file is for Commodore 64 emulators.

Hint: When you load the individual ROMs in MiniPro (the software included with the programmer), it is possible to disabling clearing the programming buffer before loading and also setting the loading address according to the table above.

After burning the ROM, I found that the Diagnostic 324517 did’nt work – the Commodore 64 just started as if no cartridge was inserted. Af re-burning the EEPROM a few times, I realized that the .bin file is corrupt and converted the .crt file to a .bin fil using CARTCONV.EXE from the VICE Commodore 64 emulator. That worked. I’ve added a comment on the WorldOfJani blog about that.

On my to-do list is to create the two different test harness required by four of the ROMs.

Commodore 64 s/n U.K.B1697889 Repair Log

Commodore logo

Do you have a defective / non working Commodore 64 breadbin?
I probably want it!
Make me an offer on gert@dabbler.dk and state if you want to sell it or swap it for this working one (you will have to pay my costs in parts and shipping – but not my time) 🙂


Purchased 8th August 2017 on eBay:

  • Breadbin: SER.NO.U.K.B1697889
  • PSU: Part no. 251 053-11
  • Datasette: C2N, Serial No 01202217, Made in Taiwan
  • Motherboard: S/N UA196145, assy No. 250407, artwork no. 251137, rev. B. Made in Hong Kong


Chips:

  • U1: CIA, MOS 6526, week 39, 1984
  • U2: CIA, MOS 6526, week 39, 1984
  • U3: BASIC ROM, MOS 901226-01, week 28, 1984
  • U4: Kernal ROM, MOS 901227-03, week 36, 1984
  • U5: Character ROM, MOS 901225-01, (no week/year)
  • U6: Color RAM, MM2114N, week 32, 1984
  • U7: CPU, MOS 6510, week 27, 1984
  • U17: PLA, MOS 906114-01, week 35, 1984
  • U18: SID, MOS 6581, week 34, 1984. Defective – replaced with 6581R4AR, week 14, 1990
  • U19, VIC2, MOS 6569R3, week 39, 1984
  • RAM, 7*OKI M3764-20, 1*Sharp LH2164-15


Sellers description:

Commodore 64 Computer C64 Breadbin With Power & Datasette Faulty Spares & Repairs BUY NOW.
Greet Computer found in job lot of items and will sadly not power on ?
Maybe easy fix for someone or at least loads of spares. Comes with power pack and datasette only.


Repair log:

  • 9v, 1.5A fuse in PSU blown, changed
  • SID defective, black screen. Works w/o sound when removed. Replaced with spare
  • PSU 5v rail rebuild for future proofing:
    7805 voltage regulator, original electrolytic capacitor and a few other passive components  replaced with 3A buck converter with 4700uF 25v electrolytic capacitor on input. Patched in after diode rectifier.
  • Re-capped motherboard
  • Future proofed the larger MOS chips which heat sinks
  • Cleaned and lubricated datasette
  • Re-capped datasette
  • Fixed ticking noice from datasette when fast forwarding with a piece of heat shrink tube (se picture)
  • Changed both drive belts in datasette
  • Over-voltage protection of 5v PSU-rail on motherboard (installed P6KE6.8CA)


Costs (total DKK 875):

  • Breadbin, PSU and datasette: DKK 525.-
  • SID: DKK 250,-
  • Misc.: DKK 100,-

Let me know if you will buy or swap with this unit 🙂

Annoying non-rotating picture frame

Big Ben upside-down

If you got a cheap Chinese Picture Frame, you have probably noticed that half your pictures are upside-down, or rotated left or right.

It happens even if the pictures are shown correctly on your computer, so if you got loads of pictures on your frame, it can be quite a hassle to figure out which files are orientated wrong.

The cause of this is the EXIF attribute which stores the correct orientation of the picture. Or rather that most Picture Frames ignores this attribute, probably because they do not have the CPU power to rotate the picture anyway.

The easiest fix is to run this PowerShell script on all your pictures – it will read the EXIF attribute and actually rotate the picture so your Picture frame does not have to.

Have fun!


2020-04-11: Updated: Now the script also resizes images (while maintaining aspect ratio) so your huge images won’t fill up your picture frame (remember to keep a copy of the images if you need them in full resolution)

# 20200411 Gert Lynge. Source: http://www.dabbler.dk
#
[System.Reflection.Assembly]::LoadWithPartialName("System.Drawing") > $null

function Get-EXIFRotationAttribute($FilePath) {
# Returns:
# 1 = "Horizontal"
# 3 = "Rotate 180 degrees"
# 6 = "Rotate 90 degrees clockwise"
# 8 = "Rotate 270 degrees clockwise"
  $WiaImage = New-Object -ComObject Wia.ImageFile
  $WiaImage.LoadFile($FilePath)
  if($WiaImage.Properties.Exists("274")) {
    return ($WiaImage.Properties.Item("274").Value)
  }
  return -1
}

function RotateClockwise-JpegImage($Degrees,$FilePath) {
  $Image = [System.Drawing.image]::FromFile( $FilePath )
  switch($Degrees) {
    90  { $Image.rotateflip("Rotate90FlipNone") }
    180 { $Image.rotateflip("Rotate180FlipNone") }
    270 { $Image.rotateflip("Rotate270FlipNone") }
  }
  $Image.save($FilePath)
  $Image.Dispose()
  Write-Host -ForegroundColor Yellow "$FilePath rotated $Degrees degrees clockwise"
}

function ResizeImage() {
    param([String]$ImagePath, [Int]$Quality = 90, [Int]$targetSize, [String]$OutputLocation)
 
    Add-Type -AssemblyName "System.Drawing"
 
    $img = [System.Drawing.Image]::FromFile($ImagePath)
 
    $CanvasWidth = $targetSize
    $CanvasHeight = $targetSize
 
    #Encoder parameter for image quality
    $ImageEncoder = [System.Drawing.Imaging.Encoder]::Quality
    $encoderParams = New-Object System.Drawing.Imaging.EncoderParameters(1)
    $encoderParams.Param[0] = New-Object System.Drawing.Imaging.EncoderParameter($ImageEncoder, $Quality)
 
    # get codec
    $Codec = [System.Drawing.Imaging.ImageCodecInfo]::GetImageEncoders() | Where {$_.MimeType -eq 'image/jpeg'}
 
    #compute the final ratio to use
    $ratioX = $CanvasWidth / $img.Width;
    $ratioY = $CanvasHeight / $img.Height;
 
    $ratio = $ratioY
    if ($ratioX -le $ratioY) {
        $ratio = $ratioX
    }

    if ($ratio -ne 1) { 
      $newWidth = [int] ($img.Width * $ratio)
      $newHeight = [int] ($img.Height * $ratio)
 
      $bmpResized = New-Object System.Drawing.Bitmap($newWidth, $newHeight)
      $graph = [System.Drawing.Graphics]::FromImage($bmpResized)
      $graph.InterpolationMode = [System.Drawing.Drawing2D.InterpolationMode]::HighQualityBicubic
 
      $graph.Clear([System.Drawing.Color]::White)
      $graph.DrawImage($img, 0, 0, $newWidth, $newHeight)
 
      #save to file
      $img.Dispose()
      $bmpResized.Save($OutputLocation, $Codec, $($encoderParams))
      $bmpResized.Dispose()
      
      Write-Host -ForegroundColor Yellow "$FilePath scaled to $newWidth * $newHeight"
    }
}

function Rotate-JpegImages($ImagePath) {
  write-host -ForegroundColor Yellow "Checking for jpg/jpeg images that needs rotation in path $ImagePath (including subdirectories)..."
  $JpegFiles = get-childitem -Recurse -Path "$ImagePath\*" -File -Include @("*.jpg","*.jpeg")
  ForEach($JpegFile IN $JpegFiles) {
    $FilePath = Join-Path -Path $ImagePath -ChildPath $JpegFile.Name

    $EXIFRotationAttribute = Get-EXIFRotationAttribute $FilePath
    switch($EXIFRotationAttribute) {
      6 { RotateClockwise-JpegImage 90 $FilePath }
      3 { RotateClockwise-JpegImage 180 $FilePath }
      8 { RotateClockwise-JpegImage 270 $FilePath }
    }

    ResizeImage -ImagePath $FilePath -targetSize 1280 -OutputLocation $FilePath

  }
}

# Rotate all images on D: (including files in subdirectories)
clear
Rotate-JpegImages "D:\"