Unfortunately we are still awaiting the release of the MEP protocol from NES (Networked Energy Services) as mentioned in previous blog entries. This will release us from the Non-Disclosure Agreement (NDA) keeping all this a secret to you.
…but while we wait, we could introduce you to our hardware prototype.
In our first few attempts we got the connector totally wrong.
Apparently the footprint we used while doing our PCB design numbered the pins 2 columns in 3 rows, while NES numbered them with 3 columns in 2 rows:
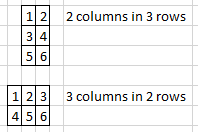
Naturally we messed that up! Luckily we actually did some sanity testing before just inserting this prototype into the meter, and we did discover the error and simply connected with some wires to quickly fix it.
We wrote about the pin connections previously, but just to recap:
Pin 1: Ground
Pin 2: Enable. Set to +5VDC or +12VDC to tell the meter the MEP interface is active
Pin 3: TXD (meter’s serial receive pin)
Pin 4: RXD (meter’s serial transmit pin)
Pin 5: Power. +24 or +26VDC (max 1W) from meter
Pin 6: Not used / no connection
Note: It depends on the hardware model of the meter if pin 5 supplies 24 or 26VDC.
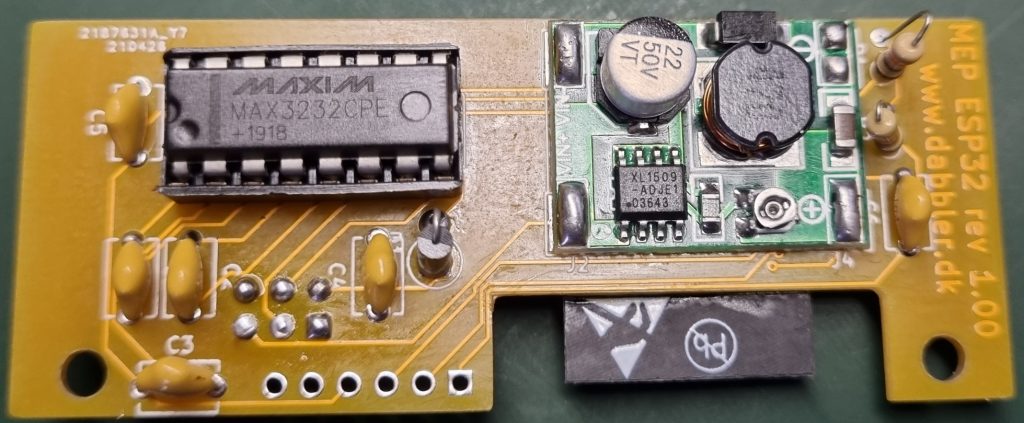
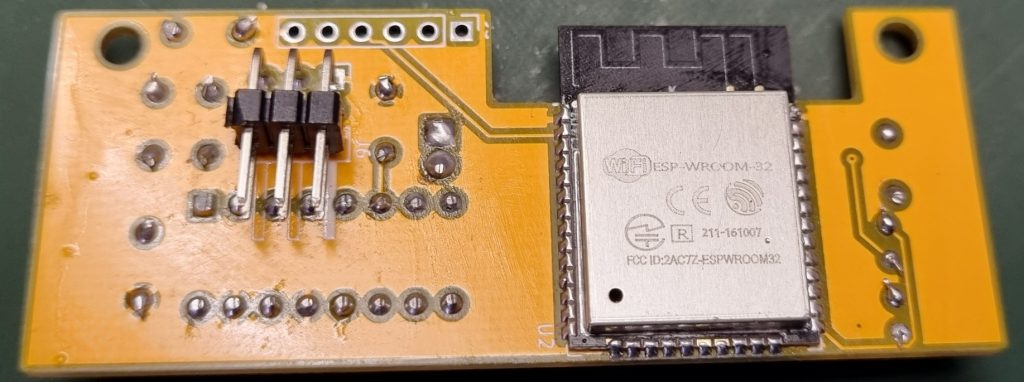
Due to the wires, we could move on with the software… While awaiting a new prototype PCB from JLCPCB… But let us explain a bit about the hardware prototype:
The ideas behind this hardware are quite simple:
- The ESP32 is a 3.3VDC device, it needs the voltage from the meter reduced in an efficient way as we need the 1W it can deliver (we use a Chinese buck converter to keep it simple).
- We need to be able to program the ESP32 in circuit (so we don’t need to program it before soldering it / de-solder it if something goes wrong). So the primary serial interface of the ESP32 is routed to the unpopulated 6 pin connector at the edge of the print.
To program the ESP32 we need to put it in programming mode. The resistors and capacitor next to it is for that…
Luckily the ESP32 also have a second serial interface we can use to communicate with the meter now we use the first one for debugging and in circuit programming. - The meter is RS232, the ESP is 3.3VDC TTL – so how do you convert that? A Max3232 can do just that, it is 3.3VDC too (it got a Max232 brother that is 5VDC). It has a built in boost converter that boosts the 3.3VDC back up to the signals level of RS232.
The capacitors surrounding it is for this boost converter. - The meter also requires a Enable pin to be set high. Luckily the Max3232 got a second receive/transmit logic. We can just use the second transmit logic to make an Enable pin controlled by the ESP32. Only problem is that is should probably not go negative (like RS232 will), but we fix that with a diode.
Not much to it – or is it really this simple?
Stay tuned for an update on the next hardware version of ESP32 MEP…. Coming to www.dabbler.dk real soon now…
Nice to see some progress.
I have a Echelon 83332-3IAAD power meter and hopes that the MEP protocol soon will be released and you will share you software, ot it is possible for me also to monitor the meter in a smarter way.
I tried to open my MEP drawer on my meter, and to my surprise, i found that a board already was mounted. You can see the board here: https://ibb.co/ZMsrj74
You mentioned in a earlier post, that a dummy board was mounted in your meter, was it a similar board?
Just contact me, if you want more to test your board.
Hi Glen
Graves – co-auther of this blog – also got a Echelon 83332-3IAAD (we assumed he had the same model as me – Echelon 83331-3IAAD as they look alike, but just discovered a few days ago his model was another on). This model no. is the one we have experienced the most issues with in regards to make our hard-/software work – but as we got access to one, we’ll work hard to get it working.
Also we have it working in another similar model, but I don’t have the model no. right here… Apparently there are more of these meters that looks alike.
Regarding your module – it is the same hardware as we “got our hands on” and dumped communication data from. We have a picture of it in this blog post (https://www.dabbler.dk/index.php/2021/09/14/echelon-nes-smart-meters-the-secret-interface/), where we also link to a PDF showing it. It looks similar to your photo?
To our knowledge it is developed by http://www.develco.com. We are not 100% sure what it is. Initially we thought it was a Zigbee modulet letting you talk to the meter somehow. But actually now we more believe that it is a Wireless MBUS to MEP device. If you live in Herning we have heard that in that city the MEP drawer is used with a module that is reading your water meter (through Wireless MBUS maybe?) and sending those readings along with the power meter data to be collected by N1 (via one of their remote reading solution in the power meter) . Then they’ll probably be forwarded from there to your water supplying company.
So if you live in Herning that will be my guess, and if so you should probably not remove it for very long :-)… By the way, you should see a M or MP icon in your meter if it is working…
Btw: I know we are “dragging our feet” a bit with these blog post. According to NES the protocol will be made available for everyone in Q4 2021… We are simply trying to tell as much as we can while waiting…. As soon as they release it, we’ll make sure we only use what they have chosen to release and then make our hard- and software available for anyone…
I can’t wait to explore all you great work. Cross my fingers
Hi Søren,
Thanks for your kind words.
We are just as exited to get this released as you are.
Seems people have been trying to read from these meters for years without much luck.
A very small “Sneak preview”:
My meter’s display is showing 115949 kWh
When asked, our ESP32 MEP software says (stuff under NDA replaced with *’s):
—
0x** Full Table Read: **** Current Register Data
Meter response: 0x** Successful response
Fwd Active Wh L1L2L3: 115949904
Rev Active Wh L1L2L3: 201
—
(no, I never produced any power here, so the 201Wh must be from testing the meter when it was produced 🙂 ).
Yes. I have tried for ages to get some readings from this meter. I ordered a meter swap because I have a 1-phase solar power system and I wanted a more accurate calculation of the kWh running to and from my system. And after I received this meter I’ve tried everything. I have seache every corner of the internet to find any useful info without luck so when I stumbled over your site my day was safed
Hi Søren
Again thanks for your interest in the project.
Yes, the information about this MEP port/protocol is hard to find. I hope we’ll soon be able to release everything. While you are waiting consider requesting the MEP key from your electricity supplier – we describe how in one of the entries.
Then you have it ready when we start releasing stuff.
BR
Gert
Hello, I just foundthis blog, and see last comments are quite old, I am building my Home Assistant system and like to have central register of my media/energy usage.
Unfortunately 😉 I do have Echelon electricity meter. And it has this small drawer with 6 pin socket. Naturally I am very interested if you finaly have had any success with reading any useful data from this devices. Let me know please if this project is still alive, or you’ve abandoned it.
Hi Marek
Sure, we do have a working prototype hardware PCB and -software.
Unfortunately I’ve stopped to develop the hard- and software as my power company has changed my meter to another model. So I have no way of testing modifications.
We hope someone else will pick up the work.
Please see:
* https://github.com/dabblerdk
* https://github.com/OSGP-Alliance-MEP-and-Optical